

This tutorial will guide you through the process of managing your own nameservers using cPanel and Plesk. Nameservers are essential for translating domain names into IP addresses, ensuring that users can access your websites.
Prerequisites
Before proceeding, ensure you have the following:
- A domain registered with a domain registrar
- A server with cPanel or Plesk installed
- Access to the server’s control panel
- Two different IP addresses for your nameservers
- The domain registrar login credentials
Managing Nameservers in cPanel
Step 1: Add the Second IP Address
- Log in to your cPanel control panel.
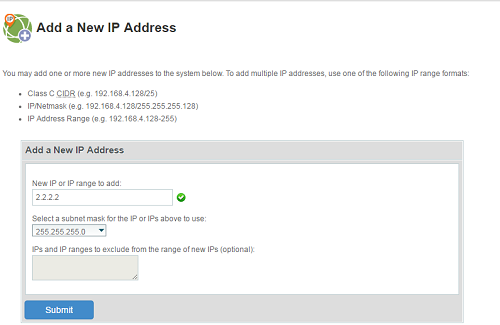
- Navigate to “WHM” > “IP Functions” > “Add a New IP Address”.
- Enter the second IP address and click “Add”.

Step 2: Configure Nameserver Settings
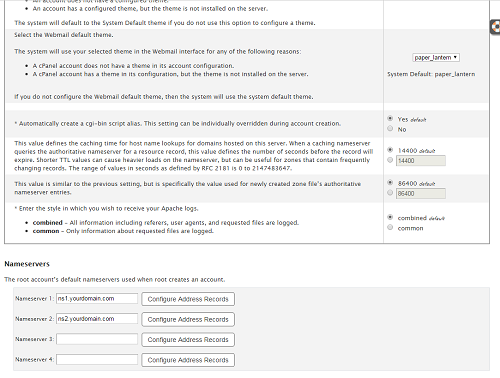
- In WHM, navigate to “Server Configuration” > “Basic Webhost Manager® Setup”.
- Scroll down to the “Nameserver(s)” section.
- Enter the two nameservers you’re using, separated by spaces.
- Click “Configure Address Records”.
- Enter the corresponding IP address for each nameserver.
- Click “Configure Address Record” for each nameserver.
- Click “Close” to save the changes.

Step 3: Create a New Account
- In WHM, navigate to “Account Functions” > “Create a New Account”.
- Enter the domain name and other account details.
- Click “Create”.
Step 4: Manage DNS Entries (Optional)
- In WHM, navigate to “Edit DNS Zone”.

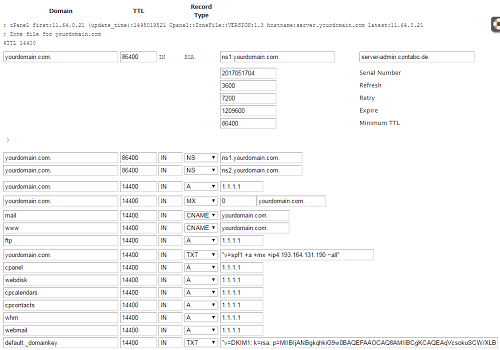
- Select the domain you want to manage.
- Modify the DNS entries as needed.
- Click “Save”.
Step 5: Configure Domain Nameserver Settings
- Log in to your domain registrar’s control panel.
- Locate the DNS management section.
- Update the nameserver settings to point to your new nameservers (ns1.yourdomain.com and ns2.yourdomain.com).
Managing Nameservers in Plesk
Step 1: Create the Domain
- Log in to your Plesk control panel.
- Navigate to “Websites & Domains”.

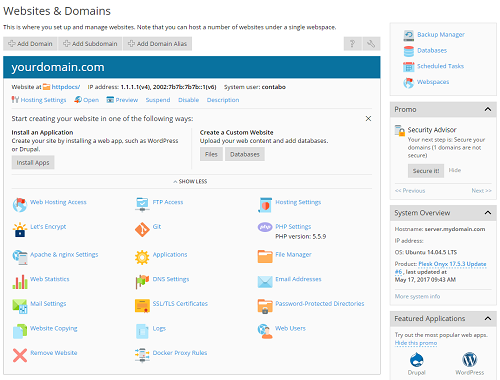
- Click “Add Domain”.
- Enter the domain name and other details.
- Click “Add Domain”.
Step 2: Add the Second IP Address
- In Plesk, navigate to “Tools & Settings” > “Tools & Resources” > “IP Addresses”.
- Click “Add IP Address”.


- Enter the second IP address and click “Add”.
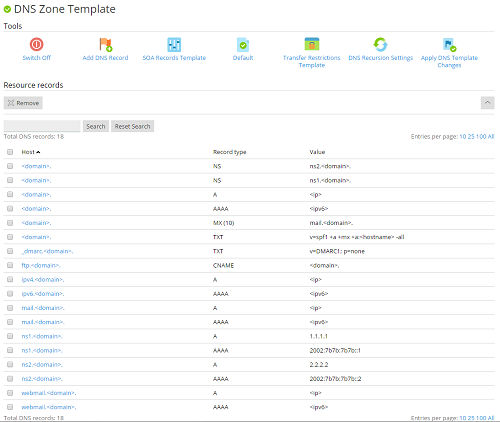
Step 3: Configure DNS Template
- In Plesk, navigate to “Tools & Settings” > “General Settings” > “DNS Template”.
- Modify the DNS entries for the nameservers:
- ns1.yourdomain.com: 1.1.1.1
- ns2.yourdomain.com: 2.2.2.2
- Click “Apply”.

Step 4: Apply DNS Template to Domains
- In Plesk, navigate to “Websites & Domains”.

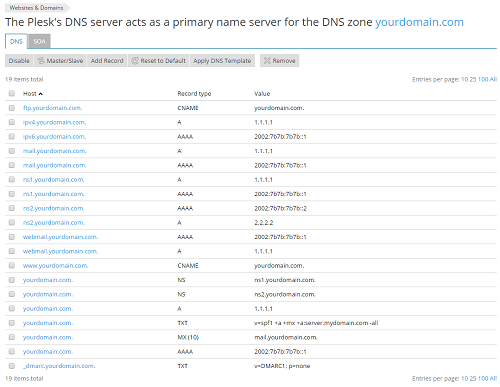
- Select the domains to which you want to apply the DNS template.
- Click “Change Service Plan”.
- Select the “DNS Template” option.
- Choose the updated DNS template.
- Click “OK” to apply the changes.
Step 5: Manage DNS Entries (Optional)
- In Plesk, navigate to “Websites & Domains”.
- Select the domain you want to manage.
- Click “DNS Settings”.
- Modify the DNS entries as needed.
- Click “Save”.
Step 6: Configure Domain Nameserver Settings
- Log in to your domain registrar’s control panel.
- Locate the DNS management section.
- Update the nameserver settings to point to your new nameservers (ns1.yourdomain.com and ns2.yourdomain.com).
Additional Considerations
-
Glue Records: If you are using subdomains as your nameservers (e.g., ns1.yourdomain.com for your domain yourdomain.com), you will need to configure glue records. These records inform the domain registrar of the IP addresses associated with your nameserver subdomains.
-
Existing DNS Zone Configuration: In some cases, you may need to modify the existing DNS zone configuration for your domain. This may involve updating the IP addresses for the nameservers or adding glue records.
-
Propagation Time: After making changes to your nameserver settings, it may take up to 24 hours for the new settings to propagate throughout the internet. This is due to the time it takes for DNS servers worldwide to cache the updated information.
-
Testing Nameservers: To verify that your nameservers are functioning correctly, you can use online tools like intoDNS. These tools will check the settings at your DNS provider and your nameservers to ensure they are resolving domain names correctly.
Troubleshooting
If you encounter any issues with your nameservers, here are some troubleshooting tips:
-
Verify the IP addresses: Double-check the IP addresses you’ve entered for your nameservers. Ensure they are correct and correspond to the IP addresses assigned to your server.
-
Check the DNS propagation time: It may take up to 24 hours for the new nameserver settings to propagate fully across the internet. If you’ve just made changes, wait some time before troubleshooting.
-
Test the nameservers: Use tools like intoDNS to test your nameservers and verify they are resolving domain names correctly.
-
Consult the domain registrar: Contact your domain registrar’s support team if you have any concerns about their DNS management services.
-
Seek community support: Utilize online forums and communities dedicated to cPanel or Plesk to seek assistance from other users and experts.
Conclusion
By following this comprehensive guide, you can effectively manage your own nameservers in cPanel and Plesk. Remember to carefully configure the IP addresses, DNS settings, and domain registrar settings to ensure your nameservers are functioning properly. If you encounter any issues, utilize the troubleshooting tips provided and reach out for community support if needed.
