
Mounting additional hard drives in Windows allows you to expand your storage capacity and utilize the extra space for various purposes, such as storing data, creating backups, or running virtual machines. This tutorial will guide you through the process of mounting an additional hard drive in Windows Server 2012, but the procedure is similar for other Windows Server versions.
Prerequisites
Before proceeding, ensure that you have the following:
-
A Windows server with an additional hard disk connected.
-
Administrative privileges on the server.
Steps
Open Disk Management
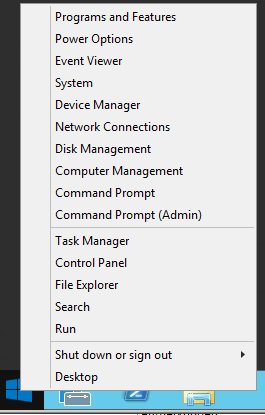
a. Right-click the Start button.


b. Select “Disk Management” from the context menu.


Initialize the New Hard Disk
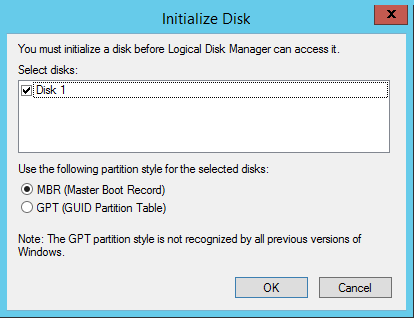
a. If Windows detects a new hard drive, a pop-up window will appear.
b. Choose “MBR” for hard drives smaller than 2 TB or “GPT” for larger disks. In this example, we’ll choose “MBR” as the hard drive has a capacity of 100 GB.
c. Click “OK” to proceed with writing the partition table to the hard disk.
Create a New Simple Volume
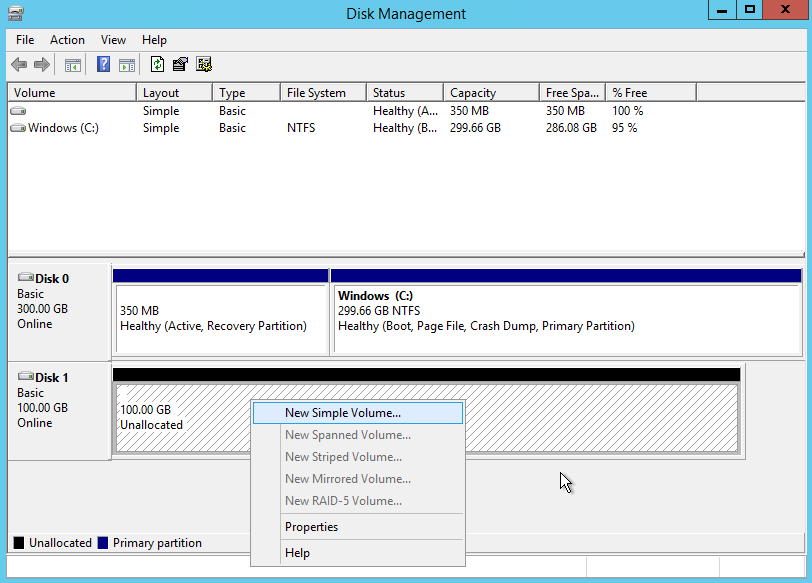
a. Right-click the unallocated space on the new hard disk (Disk 1).
b. Select “New Simple Volume” from the context menu.


c. Follow the wizard’s instructions to create a new simple volume.
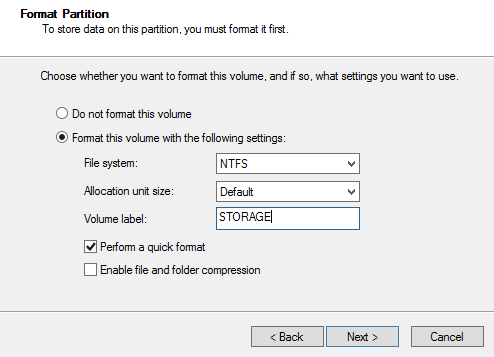
d. Accept the default settings for partition size and file system (NTFS).
e. Provide a name for the new volume, such as “STORAGE”.


f. Click “Finish” to complete the volume creation process.
Verify the Mounted Hard Drive
a. The new hard drive should now be visible in Disk Management as a mounted volume.
b. The new volume should also be accessible in File Explorer.


Additional Considerations
-
Partition Size: When creating a new volume, consider the amount of storage space you need. A larger volume will provide more storage capacity, but it may also take longer to format and access.
-
File System Choice: NTFS is the recommended file system for Windows, but other options, such as exFAT, are available for compatibility with other operating systems.
-
Volume Name: Assign a descriptive name to the new volume to easily identify it in File Explorer and other applications.
Troubleshooting
If you encounter issues while mounting an additional hard drive in Windows, consider the following troubleshooting steps:
-
Check Device Recognition: Verify that the hard disk is properly recognized by the system using the Disk Management tool.
-
Validate Disk Initialization: Ensure that the new hard disk has been initialized with an appropriate partition table (MBR or GPT).
-
Review Volume Creation: Confirm that the new volume was created successfully using the New Simple Volume wizard.
-
Check Disk Management Status: Verify that the new volume is listed as “Healthy” in Disk Management.
-
Seek Community Support: If the issue persists, consider seeking assistance from online forums or communities dedicated to Windows server administration.
Conclusion
Mounting an additional hard drive in Windows provides a simple and effective way to expand your server’s storage capacity and enhance its capabilities. By following the steps outlined in this guide, you can successfully integrate the additional hard disk into your system and utilize it for various storage and data management needs.
