In today’s world of cybersecurity, simply using passwords to protect your Server Gigabit’s server is no longer enough. Hackers can easily crack passwords using brute force attacks or other methods, putting your server at risk. A more secure method of authentication is to use SSH keys.
What are SSH Keys?
SSH keys are a cryptographic key pair that consists of a public key and a private key. The public key is shared with the server, while the private key is kept secret on your local computer. When you log in to your server using SSH keys, the server encrypts a challenge message using your public key. You then decrypt the challenge message using your private key, and the server verifies that the decrypted message matches the original challenge message. This process ensures that only you can access your server.
Benefits of Using SSH Keys
There are several benefits to using SSH keys to authenticate with your Server Gigabit’s server:
- Increased security: SSH keys are much more secure than passwords because they cannot be brute-forced or guessed.
- Convenience: Once you have set up SSH keys, you will not need to enter your password every time you log in to your server.
- Flexibility: SSH keys can be used to authenticate with any server that supports SSH key-based authentication.
How to Generate SSH Keys
Linux
- Open a terminal window on your local computer.
- Enter the following command:
ssh-keygen -t rsa
This command will generate a pair of SSH keys: a public key and a private key. The private key will be saved to the file id_rsa, and the public key will be saved to the file id_rsa.pub.
Windows
- Install PuTTY.
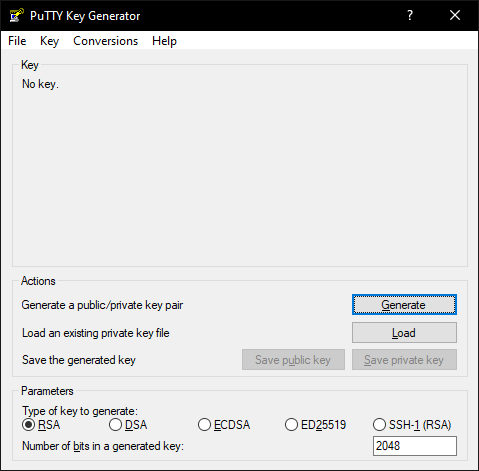
- Open the Windows search bar and search for “PuTTYgen”.
- Open it.

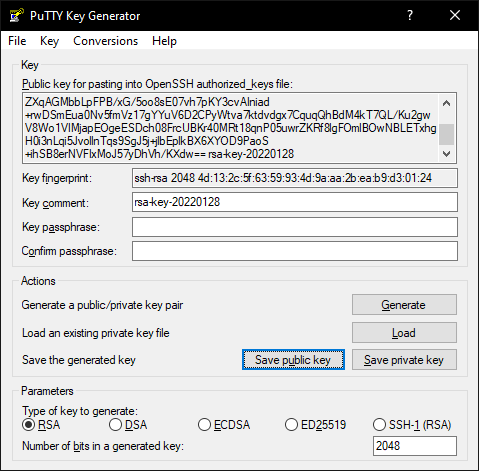
- Just click on “Generate” and move your mouse over the blank field.

How to Upload Your Public Key to Your Server Gigabit
You can upload your public key to your Server Gigabit using a variety of methods, such as FTP or the server console.
Uploading Your Public Key via FTP
- Start your FTP program and connect to your server as root.
- Create a directory in the root directory called
.ssh. - Create a file called
authorized_keysin the.sshdirectory. - Paste your entire public key into the
authorized_keysfile. - Save the
authorized_keysfile.
Uploading Your Public Key via Console
- Log in to your server as root via SSH.
- Create the
.sshdirectory and switch to it using the following command:
mkdir /root/.ssh && cd /root/.ssh
- Create and open the
authorized_keysfile using the following command:
nano authorized_keys
- Paste your entire public key into the file and save it by pressing [CTRL+O].
- Exit the editor by pressing [CTRL+X].
How to Use Your SSH Private Key
To use your SSH private key to log in to your Server Gigabit’s server, you will need to use an SSH client such as PuTTY.
Using Your SSH Private Key with PuTTY
- Open PuTTY.
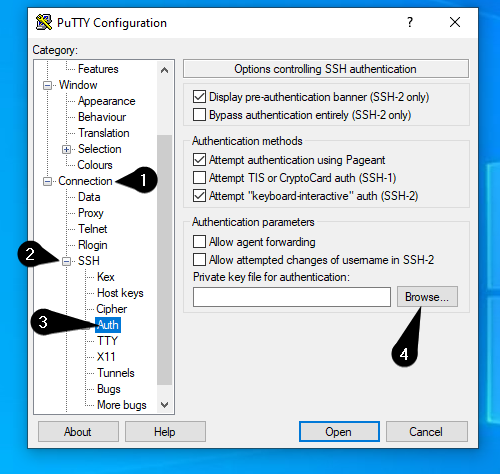
- Under “Category” on the left-hand side, select “Connection”.
- Select “SSH” from the list of protocols.
- Click on “Auth” to open the authentication settings.
- Click on “Browse” and select your private key file.

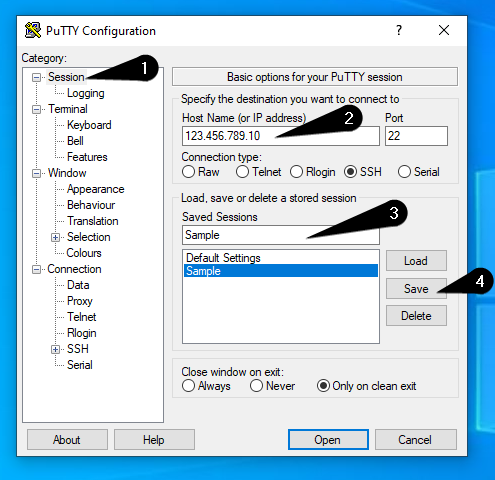
- Enter the IP address of your server in the “Host Name” field.
- Choose a profile name in the “Saved Sessions” field.
- Click on “Save” to save your profile.

Now you can double-click on your saved profile to log in to your server. You will be prompted to enter your username, but you will not be prompted to enter your password.
Testing SSH Key Authentication
Once you have set up SSH keys, you can test to make sure that they are working by trying to log in to your server using your SSH client. If you are able to log in without being prompted to enter your password, then SSH key authentication is working properly.
Disabling Password Authentication
It is a good security practice to disable password authentication once you have set up SSH keys. This will prevent anyone from logging in to your server using a password, even if they know your password.
To disable password authentication, you will need to edit the /etc/ssh/sshd_config file on your server. Find the following lines and change them to “no”:
ChallengeResponseAuthentication no
PasswordAuthentication no
Once you have made these changes, save the file and restart the SSH service using the following command:
systemctl restart ssh
Now, when you try to log in to your server using a password, you will be denied access. You will only be able to log in using SSH keys.
Removing SSH Key Authentication
If you ever decide to remove SSH key authentication and re-enable password authentication, you will need to edit the /etc/ssh/sshd_config file and change the following lines back to “yes”:
ChallengeResponseAuthentication yes
PasswordAuthentication yes
You will also need to delete the .ssh directory on your server using the following command:
rm -rf /root/.ssh
Once you have made these changes, restart the SSH service using the following command:
systemctl restart ssh
Now, you will be able to log in to your server using either SSH keys or a password.
Conclusion
Using SSH keys to authenticate with your Server Gigabit is a much more secure way to protect your server than using passwords. SSH keys are much more difficult to crack, and they provide a more convenient and flexible way to log in to your server. If you are not already using SSH keys, I highly recommend that you set them up.


