In today’s digital world, data security is paramount, and encryption plays a vital role in safeguarding sensitive information. While traditional encryption methods can be complex and costly, Let’s Encrypt offers a free and automated solution for securing websites with SSL/TLS certificates.
What is Let’s Encrypt?
Let’s Encrypt is a non-profit organization that provides free, automated, and open-source certificates for encrypting HTTPS (Hypertext Transfer Protocol Secure) connections. These certificates allow websites to establish secure connections with users’ browsers, protecting sensitive data from interception and unauthorized access.
Benefits of Using Let’s Encrypt
-
Free Certificates: Unlike traditional certificate authorities that charge fees, Let’s Encrypt provides certificates at no cost, making it an accessible solution for all website owners.
-
Automated Issuance and Renewal: Let’s Encrypt automates the process of obtaining and renewing certificates, eliminating the need for manual intervention. This ensures that websites remain secure without the burden of managing certificate expiration dates.
-
Improved Website Security: By enabling HTTPS connections, Let’s Encrypt enhances website security, protecting user data from cyberattacks and boosting user trust.
Implementing Let’s Encrypt with cPanel
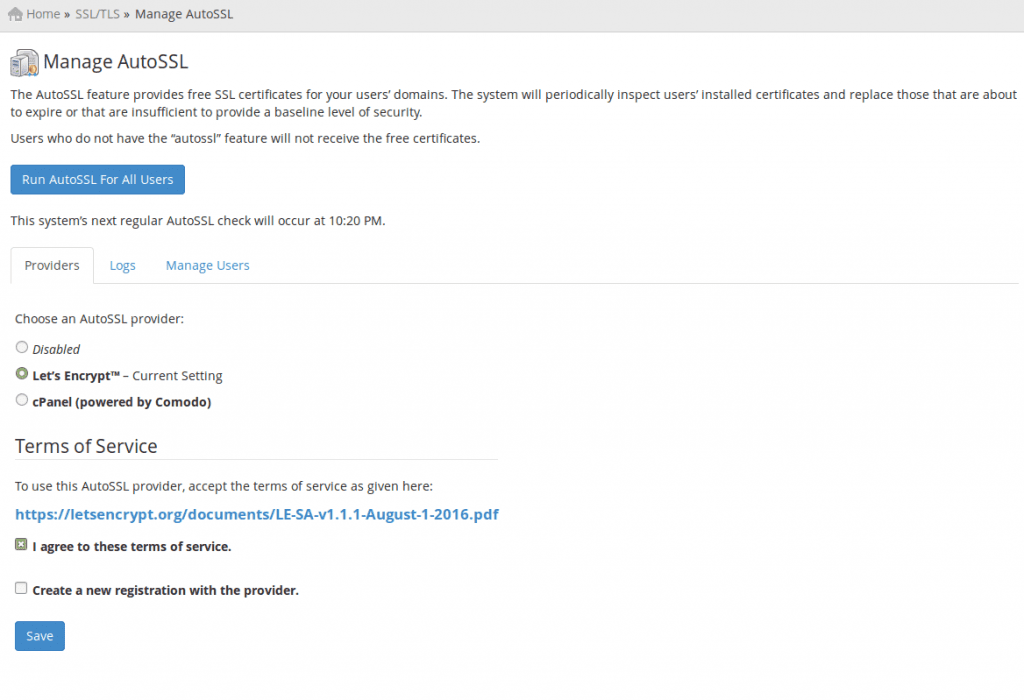
cPanel, a popular web hosting control panel, supports Let’s Encrypt through its AutoSSL feature. This feature automatically issues and renews certificates for domains managed within cPanel.
- Enabling AutoSSL: To enable AutoSSL, navigate to Home >> SSL/TLS >> Manage AutoSSL in cPanel. Select Let’s Encrypt as the default certificate provider and configure settings as desired.

Implementing Let’s Encrypt with Plesk
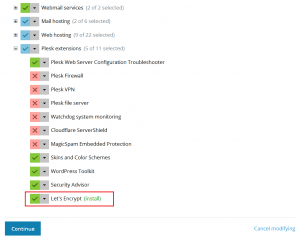
Plesk, another widely used web hosting control panel, also supports Let’s Encrypt through an extension.
-
Installing the Extension: Access Plesk’s “Tools & Settings” >> “Plesk” >> “Updates & Upgrades” section. Add the Let’s Encrypt extension from the “Add/Remove Components” tab.

-
Requesting and Activating Certificates: Once installed, navigate to “Websites & Domains” and choose “Let’s Encrypt” for the desired domain. Provide the necessary information and activate the certificate.
Implementing Let’s Encrypt without a Control Panel (Debian 8)
For those who manage their servers without a control panel, Let’s Encrypt can be implemented using Certbot, a command-line tool.
- Installing Certbot: As a root user, execute the following commands to install Certbot:
echo "deb http://ftp.debian.org/debian jessie-backports main" >> /etc/apt/sources.list && apt-get update
apt-get install python-certbot-apache -t jessie-backports
- Generating Certificates:
certbot --apache
This command will initiate an interactive dialogue to gather domain information and email addresses. Once completed, signed certificates will be generated and configured for your Apache webserver.
Implementing Let’s Encrypt without a Control Panel (CentOS 7.2)
The process for implementing Let’s Encrypt on CentOS 7.2 is similar to Debian 8, with the additional installation of the mod_ssl module for Apache.
- Installing Extra Packages:
yum install epel-release mod_ssl
- Installing Certbot:
yum install python-certbot-apache
Configuring Automated Certificate Renewal
As Let’s Encrypt certificates have a three-month validity period, automated renewal is essential. Here’s how to set up automated renewal using a cron job:
0 */12 * * * root test -x /usr/bin/certbot && perl -e 'sleep int(rand(3600))' && certbot -q renew
This cron job will check for expiring certificates every 12 hours and initiate their renewal if necessary.
Conclusion
Let’s Encrypt has revolutionized website security by providing free, automated, and easily implementable SSL/TLS certificates. By adopting Let’s Encrypt, website owners can safeguard their users’ data and enhance their overall security posture.
