
As a system administrator, safeguarding crucial data by regularly backing up the servers under your management is essential. Regular backups enable system restoration in the event of unexpected occurrences like crashes, hardware component failures, erroneous system configurations, or virus attacks.
Microsoft provides Windows Server Backup (WSB), a solution for quickly and conveniently scheduling backups of the entire server or specific storage volumes, files, or folders. This tutorial outlines the steps involved in automating backups of cloud servers using Windows Server Backup.
Installing Windows Server Backup
Windows Server Backup is a Microsoft-provided feature for creating backup copies of servers.
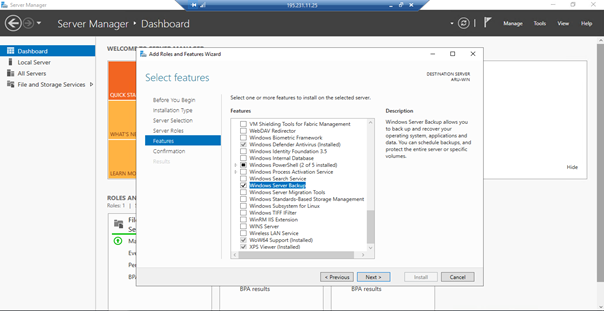
- To initiate the installation process, open the Windows Server Management Panel Dashboard, navigate to Add Roles and Features, and proceed to install the backup feature.


- A multipart window will appear on the left side of the screen. Feel free to skip the information requested in the first “Before You Begin” section and continue.
- In the second window, titled “Installation Type,” select the “Role-based or feature-based installation” option and continue.
- In the Server Selection section, choose the server on which Windows Server Backup is to be installed and proceed. Click Next to continue in the Server Roles section.
- In the Features window, scroll down and select the “Windows Server Backup” option and continue.


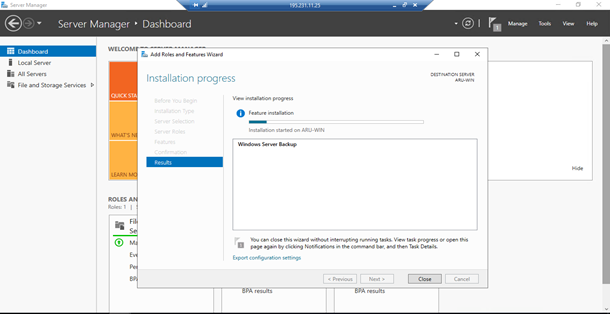
- In the Confirmation section, check the box next to “Automatically restart target servers as needed” and click Install. Once the installation is complete, click Close.


Configuring Automatic Backup
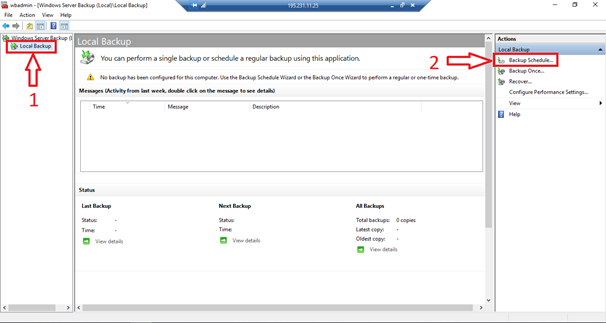
- Upon opening Windows Server Backup, select Local Backup on the left (1) and then click Backup Schedule on the right (2) to configure the automatic backup rules.


- A multipart window will appear. In the Getting Started section, simply click Next to proceed.
- If you want to create a backup of the entire system, leave the “Full server” entry selected in the “Choose a backup configuration” section. Otherwise, select “Custom” to specify only specific volumes, files, or folders for backup. Finally, click Next to proceed to the next section.
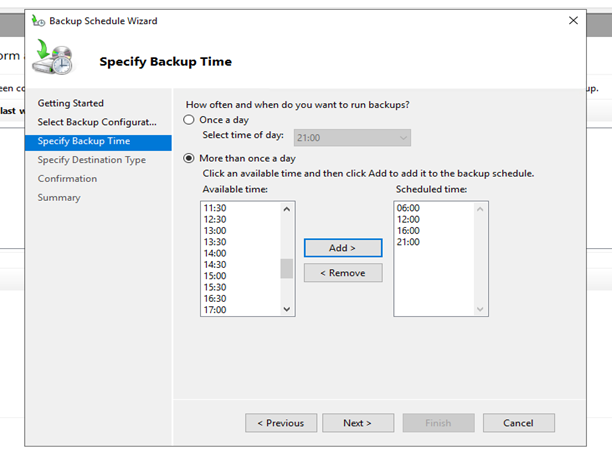
- In the Specify Backup Time section, determine whether you want to perform backups once a day at a specific time (first bullet) or multiple times on the same day (second bullet).
- If you selected the “Several times a day” option, simply select the desired time in the left column and click “Add.” To remove an incorrect time, simply click on the time in the right column and click Delete. After setting the backup frequency, click Next.


- In the Specify Destination Type section, you will be prompted to choose the location where your backup file will be stored.
Each storage option has its own advantages and disadvantages, which are listed in the respective items. Therefore, carefully consider where to store your backup.
Available Options
- Three options are available:
- Saving to local hard disk: By choosing to save to a local hard drive, you can store the backup on the server’s installed local hard drive. Remember to move any existing data to another hard drive as the chosen hard drive will be formatted.
- Saving to volume: By choosing this option, you can use a portion of your hard drive for backup storage (saving to volume). But be aware that during the backup stage, choosing this option could cause the hard drive’s read/write speed to drop noticeably. If you intend to employ this technique, scheduling the backup for when your server receives fewer requests might be a wise move.
- Saving to a folder on the network: Selecting this option allows backing up your server to a hard disk on the network. This will enable you to store your data on a NAS or another available Cloud Server. However, in this case, only one backup at a time can be saved since it is overwritten each time.
- After selecting the option that suits you, click Next. In this example, the option “Saving to volume” is selected.
- At this point, the Confirmation section provides a summary of the backup settings you have chosen.
- Click Finish to schedule the backup.
- When finished, click Close.
Conclusion
In conclusion, regularly backing up your servers using Windows Server Backup is crucial for safeguarding your data and ensuring system restoration in the event of unexpected occurrences. By following the detailed instructions provided in this tutorial, you can successfully install Windows Server Backup, configure automatic backup schedules, and select the appropriate storage location for your backup files. By implementing these measures, you can effectively protect your critical data and ensure the continued operation of your servers.
