Remote Desktop Protocol (RDP) is a versatile tool that enables users to connect to and control a remote Windows computer from their local device. While its primary function is remote administration, RDP also facilitates the mounting of local hard drives on the remote Windows server, allowing for seamless data transfer between the two systems. This guide will walk you through the process of mounting local HDDs via RDP, enabling you to access and transfer files directly from your local machine to the remote server.
Prerequisites
Before embarking on the process of mounting local HDDs via RDP, it’s essential to ensure that you have met the necessary prerequisites:
-
RDP Connection: You should have an established RDP connection to the remote Windows server. If you’re unfamiliar with establishing an RDP connection, refer to a dedicated tutorial on the topic.
-
Administrator Privileges: Ensure that you possess administrator privileges on both the local and remote Windows machines. Administrator privileges are required to make the necessary configuration changes.
Mounting Local HDDs
-
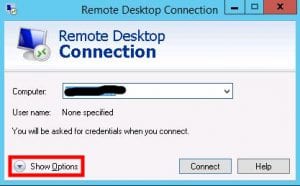
Launch Remote Desktop Connection: Begin by launching the Remote Desktop Connection application on your local Windows machine.

-
Establish RDP Connection: Enter the hostname or IP address of the remote Windows server in the designated field and click the “Connect” button.
-
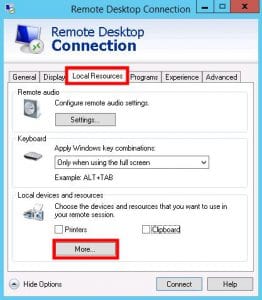
Local Resources Tab: Once the RDP connection is established, navigate to the “Local Resources” tab in the Remote Desktop Connection window.

-
Local Devices and Resources: In the “Local Devices and Resources” section, locate the “More” button and click it.
-
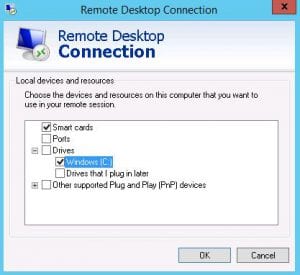
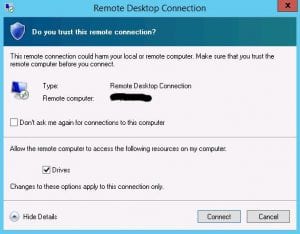
Select Local Hard Drives: A pop-up window will appear, allowing you to select the local hard drives you want to mount on the remote Windows server. Check the boxes next to the desired hard drives and click the “OK” button.

-
Confirm Mounting: You will be prompted to confirm that you want to allow remote desktop connections to access your local hard drives. Click the “Yes” button to proceed.
-
Establish Connection: Click the “Connect” button in the Remote Desktop Connection window to establish the RDP connection.

Verify Mounted Local HDDs
-
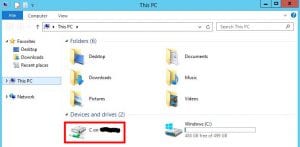
Windows Explorer: Upon successful connection, open Windows Explorer on the remote Windows server. The mounted local hard drives should appear alongside the server’s internal hard drives.

-
Data Transfer: You can now seamlessly transfer data between the local and remote hard drives, utilizing the mounted drives as if they were physically connected to the remote server.
Additional Considerations
-
Performance: Mounting local HDDs via RDP may impact the performance of the remote desktop session, especially when transferring large amounts of data.
-
Security: Ensure that you have strong passwords in place for both the local and remote Windows machines to safeguard your data.
Benefits of Mounting Local HDDs
Mounting local HDDs via RDP offers several advantages:
-
Direct Data Transfer: Enables direct and efficient transfer of data between the local and remote systems.
-
Eliminates Upload/Download Hassle: Eliminates the need for uploading or downloading large files, saving time and effort.
-
Streamlined File Access: Provides direct access to local files directly from the remote server, enhancing accessibility.
Conclusion
Mounting local HDDs via RDP streamlines data transfer between your local machine and a remote Windows server, simplifying file management and enhancing remote work productivity. By following the steps outlined in this comprehensive guide, you can effectively mount local HDDs and enjoy the benefits of seamless file access.

