
In the dynamic realm of web hosting and server management, ensuring the safety of your valuable data is of paramount importance. Data loss can occur unexpectedly, leading to downtime, loss of crucial information, and potential reputational damage. Regular backups serve as a lifeline, providing the ability to restore your server to a previous working state in case of data loss or system failures.
This comprehensive guide delves into the intricacies of using the Plesk Backup Manager to configure scheduled backups and restore data, ensuring that your server’s data remains secure and protected.
Setting Up Server Gigabit’s FTP Backup Space
-
Accessing Server Gigabit’s FTP Backup Space: The FTP Backup Space can be added during the server ordering process or by contacting Server Gigabit’s customer support team if you wish to add it for existing servers.
-
Securing FTP Backup Space: Your files are stored in Server Gigabit’s Data Center on dedicated Backup Servers, with their disks secured using a RAID6-setup. Files can be copied via FTP or FTPS.
Connecting Plesk Backup Manager to Server Gigabit’s FTP Backup Space
-
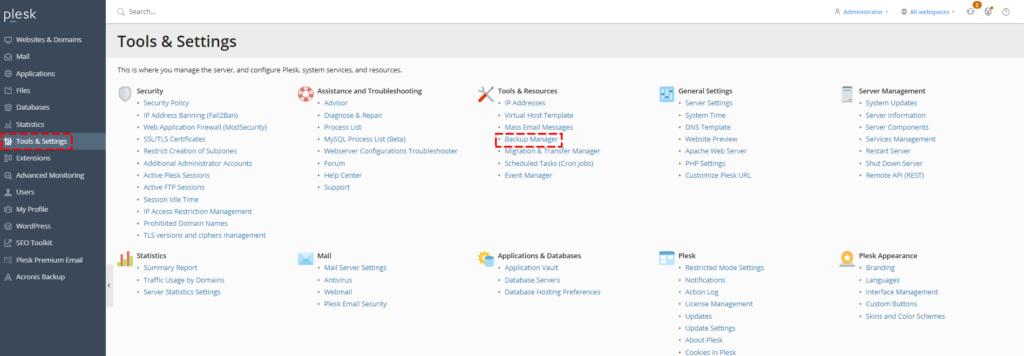
Accessing Plesk Backup Manager: Navigate to “Tools & Settings” within the Plesk interface.
-
Adding Remote Storage: Within the “Backup Manager” section, click on “Settings.”


-
Configuring FTP(S) Settings: Select “FTP(S)” and enter the login credentials provided via email for your Server Gigabit’s FTP Backup Space.

-
Saving Login Data: Click on “OK” to save the login credentials.
-
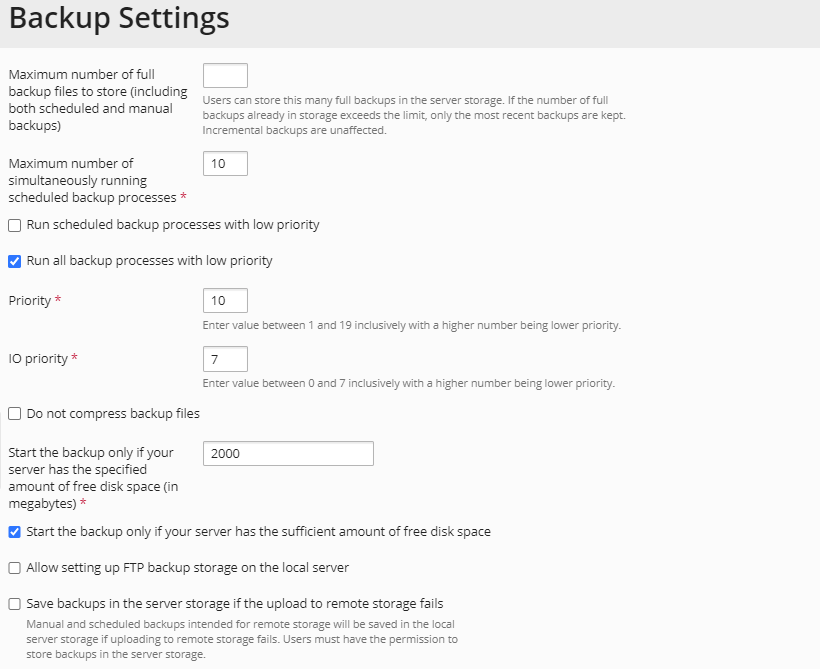
Defining Backup Parameters: Scroll down to the “Backup settings” section and adjust the options according to your requirements, such as the number of backups to store and the number of simultaneous backup processes.


-
Enhancing Backup Security: In the “Backup security settings” section, select “Specified password” and create a strong password for additional protection. Plesk encrypts the backup with a server-specific key by default, but using a specified password ensures that the backup can be restored on any server.


Creating Backups with Plesk Backup Manager
-
Initiating Backup Process: Click on “Back Up” within the Backup Manager.


-
Specifying Backup Content: Define the files and directories to be included in the backup.
-
Selecting Backup Target: Choose the Server Gigabit’s FTP Backup Space as the target storage location.
-
Defining Backup Type: Select either “Full” for a complete backup or “Incremental” for a backup of only changed files.
-
Triggering Backup: Click on “OK” to initiate the backup process.
Scheduling Automated Backups
-
Accessing Backup Schedule: Click on “Schedule” within the Backup Manager.
-
Configuring Backup Frequency: Set the desired frequency for automated backups, such as daily or weekly.
-
Specifying Backup Type: Choose either “Full” for complete backups or “Incremental” for incremental backups.
-
Defining Backup Retention: Determine the number of backups to retain for future restoration purposes.
-
Saving Schedule: Click on “OK” to save the backup schedule settings.
Restoring Backups
-
Accessing Backup List: Click on the date of the backup you want to restore from the Backup Manager interface.
-
Selecting Restore Options: Choose either “Restore all” to restore all data from the backup or “Restore selected files” to restore specific files.
-
Initiating Restore Process: Click on “Restore” to restore the selected files or all data from the chosen backup.
-
Downloading Backup: Click on the “Download” button to download the backup file to your local machine.
Conclusion
Regularly backing up your server’s data is an essential practice for any website owner or server administrator. Plesk Backup Manager provides a user-friendly interface for configuring and managing backups, ensuring that your valuable information remains secure and readily available for restoration in case of unforeseen events. By following the detailed instructions provided in this comprehensive guide, you can effectively safeguard your server’s data and maintain peace of mind.
